Bleeding, Shock and IV Fluids
MedicalHow to recognise and control bleeding on board (pressure, dressings, tourniquets, neck wounds, amputations), and how to spot and manage shock: circulation checks, haemorrhagic shock classes, IV fluids and drip-rate maths. With no doctor on board, these skills keep a trauma casualty alive until evacuation, and they are core MCA medical care exam material.
Last reviewed 1 Nov 2026 · From a professional captain's years of study notes · Organised with AI and checked against current regulations · How we write
On this page (12)
Types of Bleeding and Who Bleeds More
In short: the way the blood flows tells you which vessel is cut. Some patients bleed more than others, and internal bleeding hides.
Three vessels, three kinds of bleeding
| Type | What you see | Danger |
|---|---|---|
| Arterial | Spurting, bright red, pumped with each heartbeat | Highest — fastest blood loss |
| Venous | Steady flow, not spurting, darker red | Can still be heavy |
| Capillary | Oozing | Minor |
- Bleeding can be external or internal.
- Internal bleeding follows gravity: blood pools according to the casualty’s position, so signs can appear late — especially in obese patients. Suspect it from the mechanism of injury; don’t wait for signs.
Who bleeds more?
- Patients on aspirin or anticoagulants.
- After alcohol.
- Diabetics.
- People with bleeding disorders.
- Factor this into your assessment and your radio medical advice call.
Controlling Bleeding: Pressure, Dressings and Bandages
In short: pressure and elevation stop most bleeds. A tight pressure bandage is your strongest tool before a tourniquet.
General steps
- Lay the casualty down.
- Elevate the injured part.
- Apply direct pressure.
- Apply a dressing.
- Blood comes through → put a second dressing on top. Never remove the first.
- Check that the pressure is always on the right spot.
- Pressure points buy time while you prepare a dressing or tourniquet: press the artery where it runs over a bone — brachial (inner upper arm) or femoral (groin). Same idea as a tourniquet: artery squeezed against a single bone.
- Haemostatic agents speed up clotting: Celox granules poured into the wound, or haemostatic dressings. Expensive, and not every vessel carries them.
Tight pressure bandage — try this first
- A well-applied tight bandage controls heavy bleeding without the risk of losing the hand or limb that a tourniquet carries.
- Tighten it by twisting the bandage until the patient feels the hand go numb.
- Re-check circulation every 10 min with the finger-pinch test: press the nail for 5 s → colour must return within 1–2 s (capillary refill).
- The hand may change colour while the fingertip still refills: circulation is reduced but present. That is acceptable — keep monitoring.
- With no medical help nearby, a good pressure bandage can stay undisturbed for up to 24 h. Taking it off restarts the bleeding.
Types of bandage
- Roller bandage (gauze or crepe): holds dressings, gives direct pressure, supports sprains.
- Triangular bandage: the most versatile — arm sling, pressure pad, securing splints. Folded, it becomes a broad bandage.
- Pressure/trauma dressing (“Israeli” emergency bandage): sterile pad with a built-in elastic wrap and pressure applicator, for heavy bleeding.
- Adhesive dressings/plasters: minor wounds.
Cleaning and dressing a wound
- Sit the casualty down — they may faint. Ask about the mechanism: glass leaves fragments; a garden tool means a high infection risk.
- Irrigate with sterile saline 0.9% from single-use pods: external use only, not for injection, throw away what is left. Medicine is moving away from antiseptics (resistance), so use saline only except in special cases.
- Clean and dry with sterile non-woven swabs: over the wound first, then around it, one pass per swab, always away from the wound, never side to side.
- Dress: sterile pad (moistened with saline so it won’t stick) held by a roller bandage — firm enough for pressure, not so tight it stops circulation. Check the fingers (CRT) afterwards.
- A plain (non-pressure) bandage is never tight and overlaps the wound by at least 3 cm on each side.
- Which fluid to clean or close a wound with, and whether to give antibiotics, is decided on radio medical advice.
- Local anaesthetic: skip it for just 1–2 stitches — it needs several injections around the wound, more needle pricks than the suture itself.
Joints — figure of eight
- For elbow, knee or ankle: turns alternate above and below the joint, always advancing.
- Work distal → proximal (the direction of venous return).
- First turn comfortable — never pull tight: the bandage tightens itself as the joint moves. Finish with 2 locking turns.
- Keep the full range of movement: an immobilised joint weakens the muscles. A newer variant leaves the point of the elbow or kneecap uncovered.
Tourniquets and Catastrophic Bleeding
In short: a tourniquet is the last resort for catastrophic limb bleeding that direct pressure cannot control. Once on, it stays on.
Where to put it
- 5–7 cm above the wound (towards the heart), never on a joint.
- Only on a single-bone segment — upper arm or thigh — so the artery is squeezed against the bone.
- On the forearm or lower leg the artery runs between two bones: the tourniquet does damage but does not stop the flow.
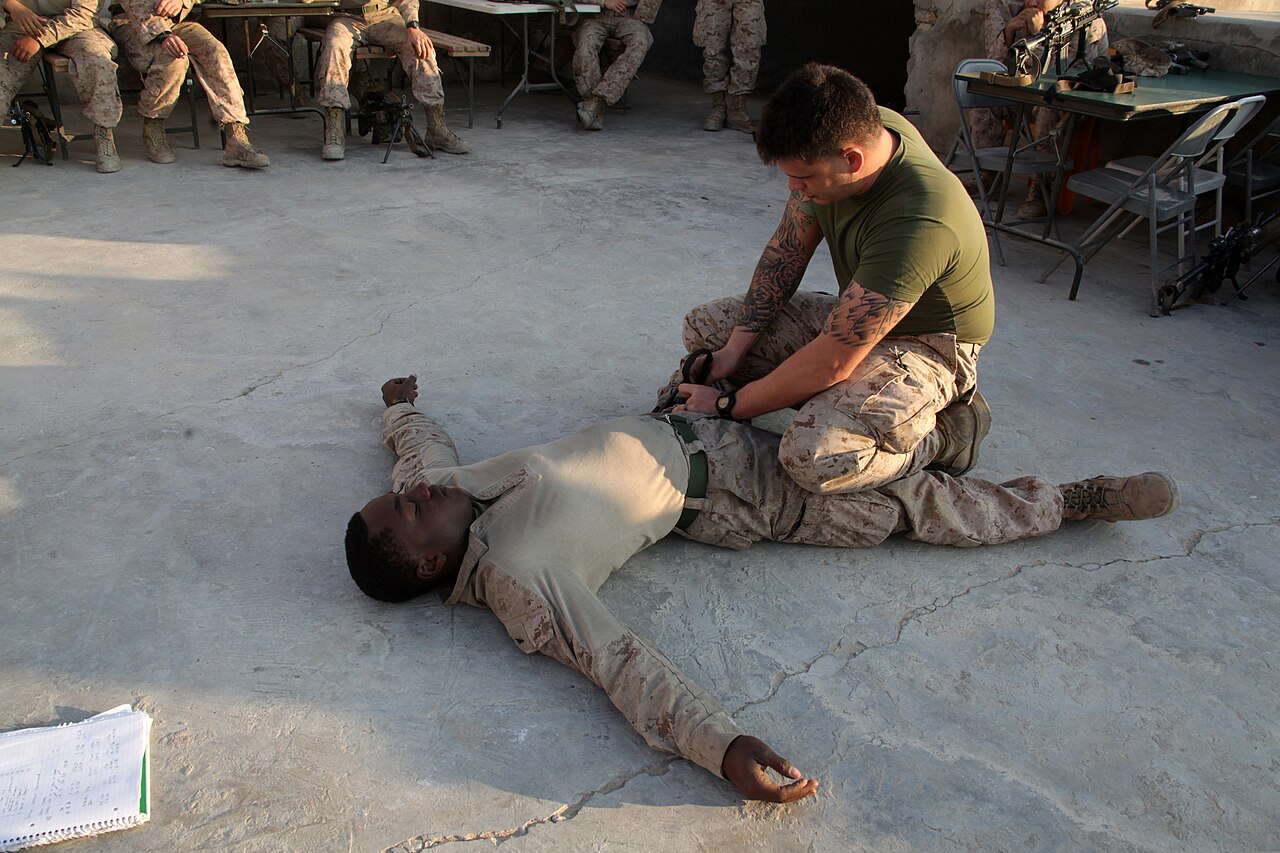
Applying a CAT (Combat Application Tourniquet)
- Pressure points (brachial / femoral) buy time while you get it ready.
- Pull the strap snug — not loose, not over-tight.
- Twist the windlass rod in half or full turns; you feel the pressure build. Keep turning until the bleeding stops.
- How tight: until there is no circulation at all — bleeding stopped and no distal pulse. Pulse still there → one more full turn, re-check after every full turn.
- Lock the windlass.
- One not enough? Apply a second tourniquet above or next to the first.
- Write down the time on the time tab and call TMAS at once: “tourniquet applied at [time]”.
- A proper tourniquet hurts a lot. The common mistake is to stop tightening because of the pain — don’t stop early.
- Improvised: a broad bandage with a rigid rod as windlass. Never wire or thin cord — it cuts the skin.
Never release it unless the doctor tells you to. The old “loosen every 15 min” rule is outdated — releasing restarts the bleeding from zero. Never cover it: it must stay visible.
Special Wounds: Neck Bleeding and Amputation
In short: on the neck, press hard on one side only and never wrap around. With an amputation, control the stump first, then look after the part.
Bleeding from the neck
- No tourniquet and no bandage all the way round the neck — you would strangle the casualty and cut the blood supply to the brain.
- Direct pressure only: a sterile pad pressed firmly on the wound, and keep pressing. Press only on the bleeding side, never both sides.
- Securing the dressing: pad on the wound → bandage over it and round the opposite side (under the opposite armpit or over the opposite shoulder), with the casualty’s opposite arm raised to anchor it.
- This gives real pressure without blocking the neck: the face may change colour, but the casualty must still breathe. Keep asking: “Can you breathe?”
- Why a bandage, not just your hand: you cannot keep up hand pressure for long, and a soaked dressing loses its effect.
- The wrap alone may not stop it; a haemostatic dressing helps a lot. Aim to reduce the bleeding until it stops.
- Large neck veins can suck in air (air embolism). Firm pressure that seals the wound prevents this too.
- Treat for shock, watch the airway (swelling or a haematoma can block it), call TMAS.
Amputation — stump and amputated part
- Control the bleeding first: pressure, or a tourniquet if it is catastrophic.
- Sterile pad over the stump end → fold the bandage back and forth over the end (recurrent turns) until the tip is fully covered.
- Lock it with criss-cross or circular turns round the limb — firm, even pressure on the end.
- Elevate, treat for shock, call TMAS.
- The amputated part: wrap in moist sterile gauze → sealed plastic bag → put the bag on ice or in cold water. Never directly on ice, never loose in water. It travels with the patient.
Shock: Recognition, Phases and First Aid
In short: shock is not enough blood reaching the organs. The body hides it at first, so treat early — before the blood pressure falls.
Signs and symptoms
- Pale, cold, clammy skin
- Fast, shallow breathing
- Thirst, nausea, dizziness
- Tiredness, disorientation, confusion
- Aggression
- Untreated, the casualty may die.
The two phases
- Phase 1 — compensation: pale, cold, clammy, fast shallow breathing. The body is protecting its oxygen supply.
- Thirst marks the move to phase 2 — the body is asking for volume.
- Phase 2: confusion, agitation, aggression → unconsciousness → death. A confused casualty is worse than phase 1; an unconscious one is worse still.
- The body compensates until about 1.25–1.5 L is lost (about 1/3 of blood volume) before BP starts to drop. Other figures you will hear: about 1–1.5 L before BP changes, and BP normal until Class III (over 1,500 ml) in the PHTLS/ATLS classes below.
- With a major bleed (e.g. amputation): the BP starts to drop, the body compensates so the drop comes late, and if too much is lost the heart can stop.
Be one step ahead: treat for shock before the pressure falls. Thirst is the alarm bell for phase 2.
First aid for shock
- Lie the casualty down and raise the legs about 30 cm to help blood back to the heart and head (EFA manual V1.3).
- Do not raise the legs with a head, spine, pelvis or chest injury, or with breathing difficulty.
- Late pregnancy: on the side — lying flat, the bump presses on the lungs.
- Treat the cause (bleeding, vomiting…).
- Insulate: keep body heat in, but don’t actively warm the casualty.
- Keep monitoring and keep talking — a casualty who “gives up” can die. Encourage them even when unconscious.
- A conscious casualty usually takes up the position that eases them — note it, it is a diagnostic clue.
- Drinks: sugar can help but is not enough. Oral rehydration salts, half a glass every 15 min, only after a doctor agrees (EFA manual V1.3).
- Nothing by mouth if unconscious, drowsy or convulsing, with an abdominal puncture or crush wound, a brain injury, or if surgery is likely.
- Alcohol — never.
Psychological shock
- The fight-or-flight survival instinct (research by John Leech) shows up in 3 phases of denial or positive action: before, during and after an incident.
- 70% of people freeze and do not try to save themselves.
- 15% become erratic and hyperactive.
- Only 15% respond calmly and positively.
- The same applies to a casualty: do they fight and start to recover, give up, or do something erratic and dangerous?
- 🎯 First aid: motivate the casualty — calmly but positively.
Haemorrhagic Shock Classes and Internal Bleeding
In short: blood loss is graded in 4 classes. The pulse rises long before the BP falls, and big bleeds can hide inside the body.
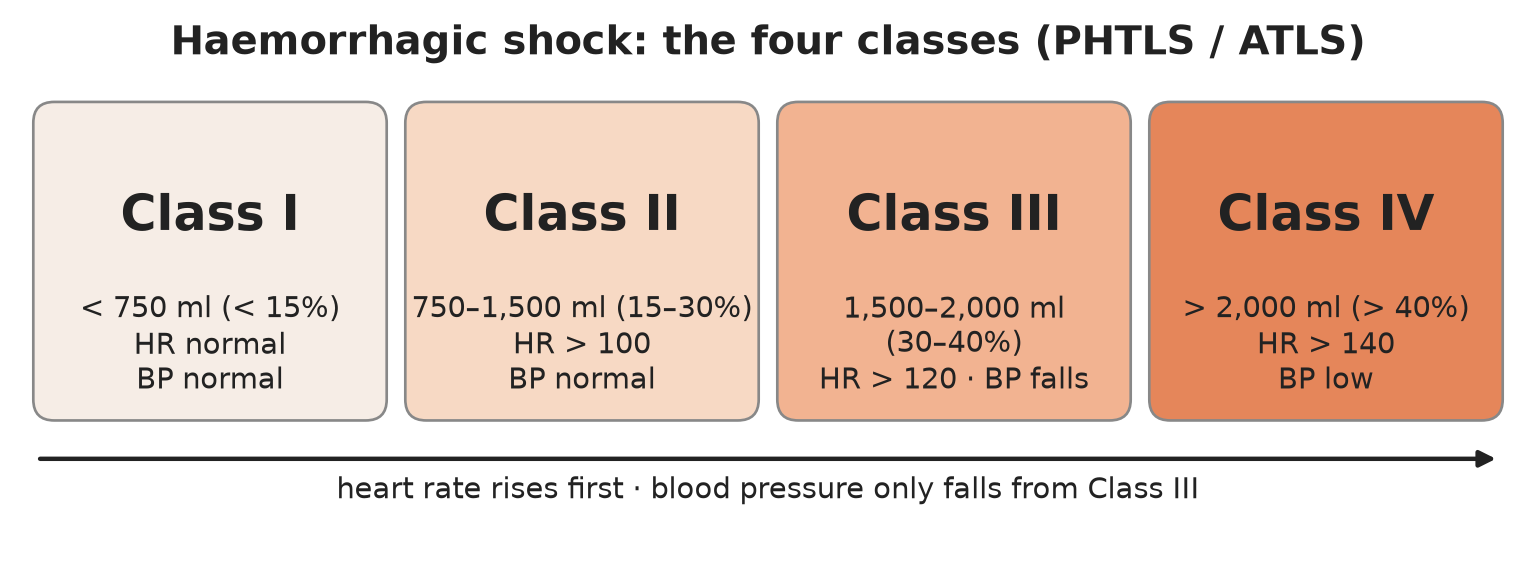
The four classes (PHTLS/ATLS)
| Class | Blood loss | % of volume | Heart rate | Blood pressure |
|---|---|---|---|---|
| I | under 750 ml | under 15% | normal | normal |
| II | 750–1,500 ml | 15–30% | over 100 | normal |
| III | 1,500–2,000 ml | 30–40% | over 120 | falls |
| IV | over 2,000 ml | over 40% | over 140 | low |
- Heart rate rises first; BP stays normal until Class III — that is compensation at work.
- Breathing rate climbs with each class.
- Urine output falls: about 20–30 ml/h in Class II, down to minimal in Class IV. Shock shuts down urine output early.
- Take baseline vital signs early: the trend shows deterioration.
Internal bleeding — causes and hidden pockets
- Abdominal trauma — the most common cause: damage to blood-filled organs such as the liver and spleen.
- Pelvic fracture — damage to the blood vessels underneath.
- Long-bone fractures (femur etc.).
- Bleeding pockets: skull/face · chest · abdomen · pelvis (can hold all 5 L) · femur (muscle-spasm pocket; bruising may reach the groin) · perineum.
Circulation Examination
In short: go from the end of the bed to the fingertips: bedside inspection → peripheries and parameters → blood pressure → abdomen. Key numbers: CRT under 2 s, BP 100–140 / 60–90, bowel sounds 3–5/min.
Bedside inspection (from the end of the bed)
- Skin colour — pink/red or pale
- Breathing rate
- Sweating
- Agitation
- Obvious bleeding from any site
Peripheries and parameters
- Hands: warm, or cold and clammy?
- Peripheral colour: pink (normal) · pale · blue · mottled.
- Capillary refill time (CRT): press the nail bed (or the mid-chest) for 5 s until white, release → pink again in under 2 s.
- Radial pulse: palpable? volume? rate? Normal 60–100/min. Brachial pulse the same way. Central (carotid) pulse — use it if the casualty is severely hypothermic.
- Blood pressure: normal systolic 100–140, diastolic 60–90 mmHg.
- Veins: neck veins distended? Veins normal, under-filled or collapsed?
- Face: pallor inside the eyelids; yellow whites of the eyes = jaundice.
- Legs: femoral pulse (thigh), popliteal (behind the knee), pedal pulses (top of the foot).
- Arterial pulses to know: radial, brachial, femoral, popliteal, dorsalis pedis, posterior tibial.
- Assess urine output if you can.
In shock, peripheral pulses go first, the carotid last: radial gone with carotid present ≈ severe hypotension. Finger clubbing points to chronic heart or lung disease.
Measuring blood pressure by hand
- Inflate the cuff above systolic: the artery is closed and you hear nothing.
- Let the cuff down: the first sounds in the stethoscope = systolic.
- The sounds stop = diastolic.
Abdomen — look, feel, percuss, listen
- Look: scars, masses, bleeding, pulsation, distended veins on the chest or round the navel.
- Feel: each quadrant in turn (think of the organs underneath); tenderness, guarding, rebound tenderness; kidneys (balloting and renal punch); masses; is the pelvis stable? are the long bones stable?
- Percuss: an enlarged liver, a full bladder, fluid in the abdomen.
- Listen: bowel sounds, normal 3–5/min.
- The 9 abdominal regions and their organs help you narrow down the cause of pain.
Circulation Management: Fluids, Splints and the Pelvic Binder
In short: the goal is to restore blood flow to the vital organs — stop the bleeding and replace fluid, without pushing the pressure so high that clots wash away.
Fluid replacement and permissive hypotension
- Get IV access early, while the casualty is still compensating — veins collapse with major blood loss. No vein → intraosseous (IO) access.
- With the IV line in place, give 500 ml boluses of crystalloid.
- After every bolus, reassess: better or worse?
- Aim for a systolic BP of 90 mmHg. Some trainers accept 90–100. This is permissive hypotension.
Careful with fluids: too much raises the pressure and dislodges the clots that are forming — the bleeding gets worse. Which fluid, how much and when: agree it with the doctor via TMAS.
Fractured long bone — splint and traction
- Obvious deformity → splint and traction to bring the bone back to its normal position; this also reduces bleeding.
- Hare traction splint for a displaced femur fracture: straps along the leg, traction at the ankle.
- Traction also relieves pain.
- Contraindicated with several fractures in the same limb, or a pelvic fracture.
- Always check pulse, colour and temperature below the fracture — a cold limb means no circulation.
Pelvic fracture
- Apply a pelvic binder at the level of the greater trochanters (the bony points at the top of the thighs). It closes the pelvic ring and reduces internal bleeding.
- No binder: wrap a sheet tightly and fix it with a knot or buckle.
- Tie the legs together.
- A full bladder helps press on the bleeding: ask the casualty not to pass urine if they can avoid it. If they must, keep the sample and check it for blood (EFA manual V1.3).
Crush injury
Crush syndrome: toxins build up in a trapped limb, and releasing the pressure can kill. Do not free the limb without medical guidance.
IV Cannulation and Drip Rate
In short: put the cannula in early and low on the arm, then set the drip by counting drops against a simple formula.
IV cannulation
- Start distal and work proximal — a blown vein ruins every site below it.
- Feel beats see: choose a vein you can feel, not just one you can see. Avoid joints; prefer the non-dominant arm.
- Gauges: pink = standard · grey = rapid fluids · blue = children.
- At flashback (blood in the chamber): advance the plastic, withdraw the needle.
- Flush with 2 ml saline before and after any drug, and inject slowly — this prevents phlebitis.
The giving set
- Spike (into the bag) → drip chamber (count the drops here) → roller clamp (sets the speed) → tubing → connector to the cannula.
- The drop factor (GTT) is printed on the package, e.g. 20 drops = 1 ml. Not printed? Assume 20 drops/ml.
Drip-rate formula and worked examples
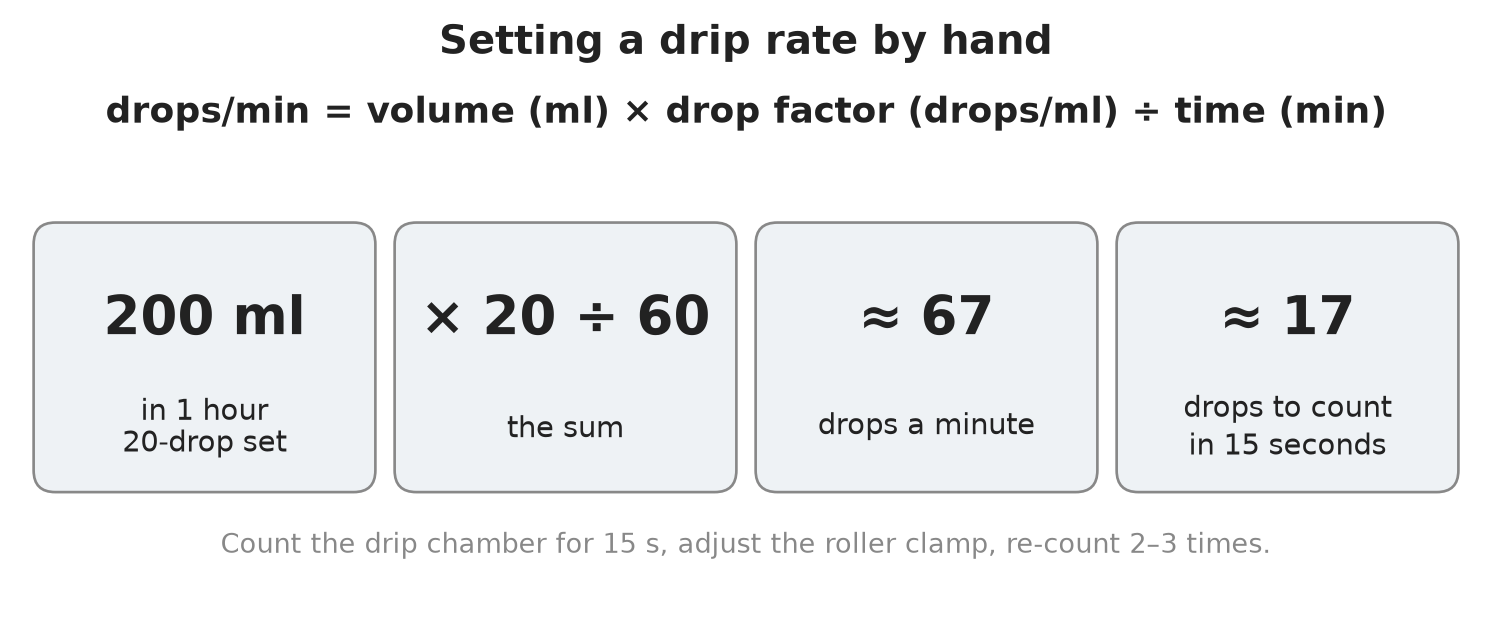
drops/min = volume (ml) × drop factor (drops/ml) ÷ time (min)
| Order | Sum | Drops/min | Count in 15 s |
|---|---|---|---|
| 200 ml in 1 h | 200 × 20 ÷ 60 | ≈ 67 | ≈ 17 |
| 4,200 ml in 8 h (burns) | 4,200 × 20 ÷ 480 | 175 | ≈ 44 |
- Work out the drops/min.
- Divide by 4 and count drops in the drip chamber for 15 s.
- Adjust the roller clamp, then re-count 2–3 times until it matches.
- Keep the bag above the heart.
⚡ Flashcards
Test yourself, one card at a timeQ1How do you tell arterial, venous and capillary bleeding apart?
AnswerArterial = spurting, bright red (most dangerous) · venous = steady flow, darker · capillary = oozing, minor.
Common trapTrap: internal bleeding can show late (gravity, obesity) — suspect it from the mechanism, don’t wait for signs.
Q2What are the general steps to control bleeding, and what do you try before a tourniquet?
AnswerLay down → elevate → direct pressure → dressing → soaked? second dressing on top. A tight pressure bandage comes first: it stops the bleed without risking the limb.
Common trapTrap: never remove the first dressing — it pulls off the clot.
Q3Where does a tourniquet go, how tight, and what then?
Answer5–7 cm above the wound, on a single-bone segment (upper arm, thigh); tighten until no distal pulse, lock, write the time, call TMAS.
Common trapTrap: never loosen it every 15 min (outdated), never cover it, never stop early because it hurts.
Q4Neck wound and amputation: what is the one rule for each?
AnswerNeck: direct pressure on the bleeding side only, bandage passed under the opposite armpit. Amputated part: moist sterile gauze → sealed bag → bag on ice or cold water.
Common trapTrap: no tourniquet or bandage around the neck; the part never directly on ice or in water.
Q5What are the signs of shock, and what marks the move from phase 1 to phase 2?
AnswerPale, cold, clammy skin · fast shallow breathing · thirst, nausea, dizziness · confusion, aggression. Thirst marks the move to phase 2.
Common trapTrap: BP holds until about 1/3 of blood volume is lost — treat before the pressure falls.
Q6How do you position a casualty in shock, and when must you not raise the legs?
AnswerLie them down, raise the legs about 30 cm, treat the cause, insulate (don’t actively warm), keep talking. Late pregnancy → on the side.
Common trapTrap: no leg raise with head, spine, pelvis or chest injury, or breathing difficulty; never alcohol.
Q7How do people react in a crisis, and what does a first aider do about it?
Answer70% freeze · 15% erratic · only 15% calm and positive (John Leech). Motivate the casualty calmly but positively.
Common trapTrap: “giving up” can kill — keep talking to them, even when unconscious.
Q8In haemorrhagic shock, what rises first and when does blood pressure fall?
AnswerHeart rate rises first (Class II over 100, III over 120, IV over 140). BP stays normal until Class III (1,500–2,000 ml, 30–40%).
Common trapTrap: a normal BP does not rule out major bleeding — watch pulse, breathing and urine output.
Q9Where can a casualty lose litres of blood without any visible wound?
AnswerAbdomen (liver, spleen — most common), pelvis (can hold all 5 L), femur, chest, skull/face, perineum.
Common trapTrap: suspected pelvic fracture → pelvic binder at the greater trochanters, legs tied, and no traction splint.
Q10What is a normal capillary refill time, and which pulse disappears last in shock?
AnswerCRT under 2 s · pulse 60–100/min · BP 100–140 / 60–90. Peripheral pulses go first, carotid last.
Common trapTrap: radial pulse gone but carotid present = severe hypotension.
Q11How do you give IV fluids to a bleeding casualty, and what blood pressure do you aim for?
AnswerIV line early → 500 ml crystalloid boluses, reassess after each. Aim for systolic 90 mmHg (some accept 90–100) = permissive hypotension.
Common trapTrap: too much fluid raises the BP and washes the clots away — agree fluids with TMAS.
Q12How do you work out an IV drip rate?
Answerdrops/min = ml × drop factor (GTT) ÷ minutes. No GTT on the set → assume 20 drops = 1 ml. 200 ml in 60 min ≈ 67 drops/min.
Common trapTrap: count for 15 s (divide by 4) and re-count 2–3 times; keep the bag above the heart.
📚 Resources
Video
- Combat Application Tourniquet (C-A-T) Instructions — North American Rescue - Official Channel
- How to Treat a Casualty for Shock — First Aid Training Co-operative
- IV Drip Flow Rates Drop Factor gtts/minute Dosage Calculations Nursing | NCLEX Review — RegisteredNurseRN
Books
- The Ship Captain’s Medical Guide — Maritime and Coastguard Agency, 24th edition (2024)
- International Medical Guide for Ships — World Health Organization, 3rd edition
Regulations
- MSN 1905 (M+F) Amendment 5 — ships’ medical stores — minimum medical stores; Amendment 5 names the IV fluid in the advanced treatment bag (Ringer’s lactate 1 L)
Official sites
- Severe Bleeding First Aid — St John Ambulance
- Shock Symptoms and First Aid — St John Ambulance
Exam focus — MCA
Typical questions: “A crew member has a deep cut on the forearm that won’t stop bleeding — talk me through it.” · “Where do you put a tourniquet, how tight, and what do you do afterwards?” · “How do you recognise shock, and how do you position the casualty?” · “Why don’t you push the blood pressure back to normal with IV fluids?” · “Calculate the drip rate for 1 L over 4 hours with a 20-drop set.”
What examiners want: a clear escalation — pressure, elevation, second dressing, tight pressure bandage, tourniquet as last resort; tourniquet on a single-bone segment, tightened until the distal pulse is gone, time written, TMAS called, never released or covered; shock treated before BP falls (pulse rises first, BP holds until Class III); leg raise with its exceptions and nothing by mouth when it is unsafe; 500 ml crystalloid boluses to a systolic of about 90 mmHg (permissive hypotension); and the drip formula worked cleanly (1,000 × 20 ÷ 240 ≈ 83 drops/min, about 21 per 15 s).